# Portainer Staging Server Deployment
# Create a Stack on Portainer
# 1) Log into Portainer
Go to https://portainer.stage.14four.com/ and login using your 14Four google account.
# 2) Add your new stack
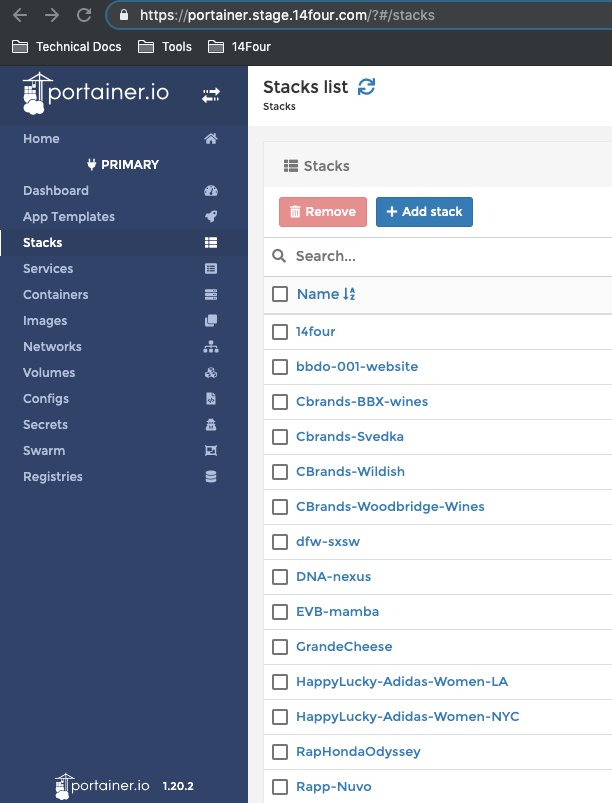
# 3) Create your compose file.
TIP
You can use the example compose file below as a template, but uou will need to edit the compose to use your ENV variables, image name, URL, etc.
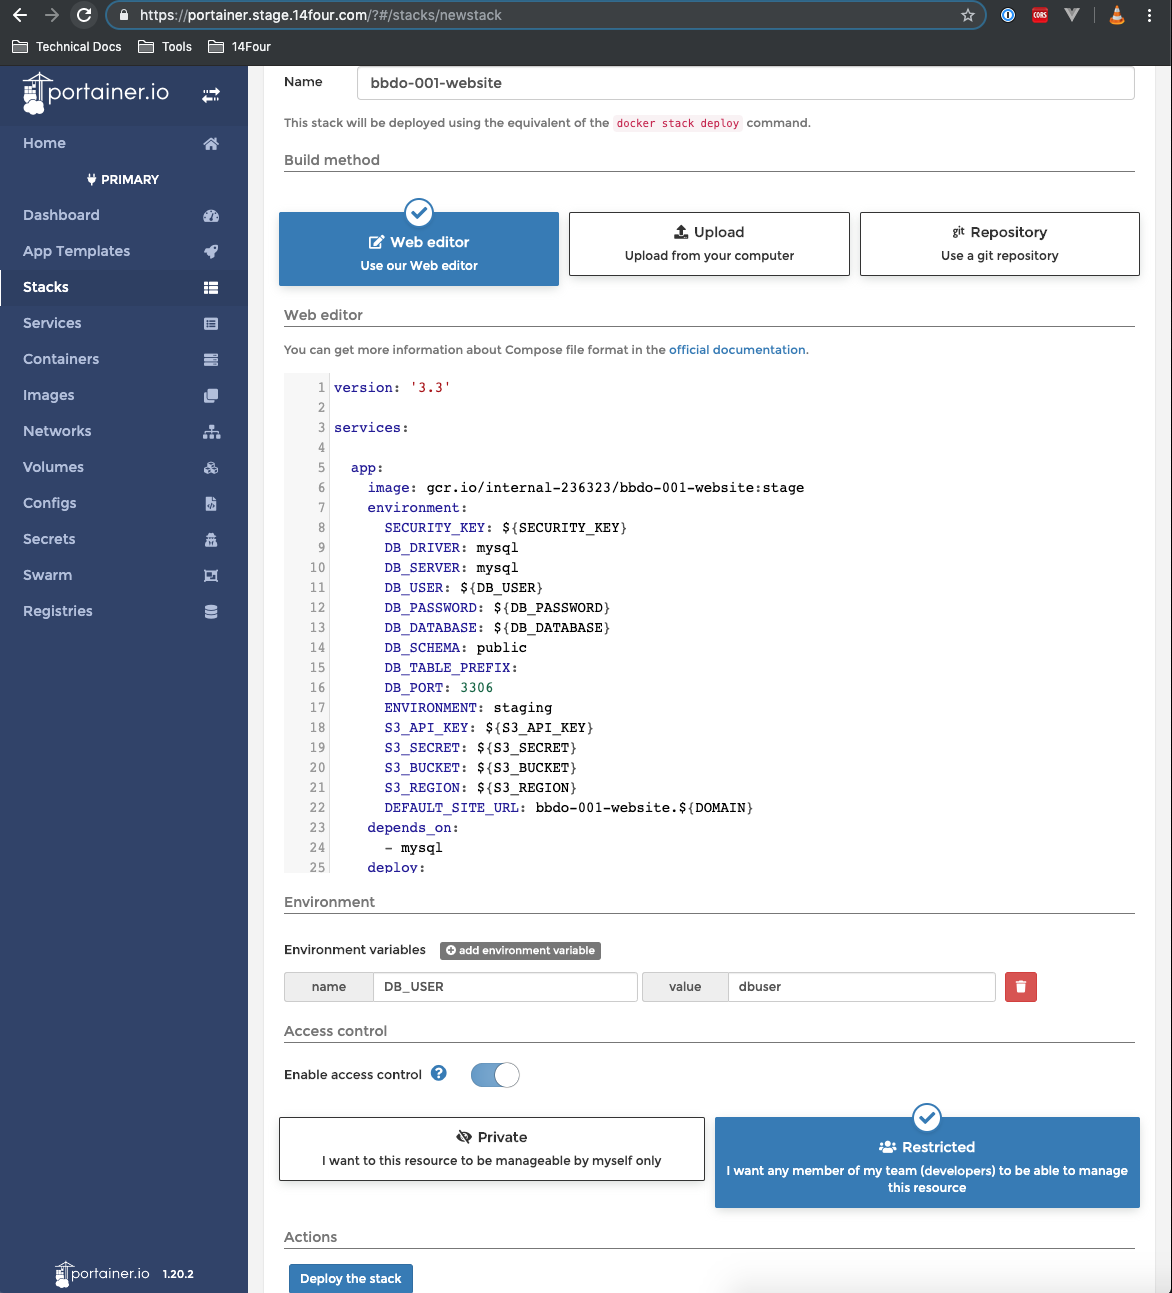
version: '3.3'

services:

  app:
    image: gcr.io/internal-236323/agency-client-001-website:stage
    environment:
      SECURITY_KEY: ${SECURITY_KEY}
      DB_DRIVER: mysql
      DB_SERVER: mysql
      DB_USER: ${DB_USER}
      DB_PASSWORD: ${DB_PASSWORD}
      DB_DATABASE: ${DB_DATABASE}
      DB_SCHEMA: public
      DB_TABLE_PREFIX:
      DB_PORT: 3306
      ENVIRONMENT: staging
      S3_API_KEY: ${S3_API_KEY}
      S3_SECRET: ${S3_SECRET}
      S3_BUCKET: ${S3_BUCKET}
      S3_REGION: ${S3_REGION}
      DEFAULT_SITE_URL: agency-client-001-website.${DOMAIN}
    depends_on:
      - mysql
    deploy:
      resources:
        limits:
          cpus: '0.75'
          memory: 300M
      labels:
        - traefik.stagenew.frontend.rule=Host:agency-client-001-website.${DOMAIN}
        - traefik.tags=${TRAEFIK_PUBLIC_TAG:-proxy}
        - traefik.enable=true
        - traefik.port=8080
        - traefik.docker.network=proxy
    networks:
      - internal
      - proxy

  mysql:
    image: mysql:5.7.22
    restart: unless-stopped
    ports:
      - 0:3306
    environment:
      MYSQL_DATABASE: ${DB_DATABASE}
      MYSQL_USER: ${DB_USER}
      MYSQL_PASSWORD: ${DB_PASSWORD}
      MYSQL_ROOT_PASSWORD: ${DB_ROOT_PASSWORD}
    volumes:
      - agency-client-001-website-mysql-db:/var/lib/mysql
    networks:
      - internal

# Setup Networks
# internal for internal communications
# Proxy for Traefik communications
networks:
  internal:
    external: false
  proxy:
    external: true

volumes:
  agency-client-001-website-mysql-db:
    driver: rexray/ebs
    driver_opts:
      size: 1
# Create a Pipeline on Bitbucket
# 1) In your bitbucket repo Navigate to the pipelines tab.
Select Docker and add a bitbucket-piplines.yaml file.
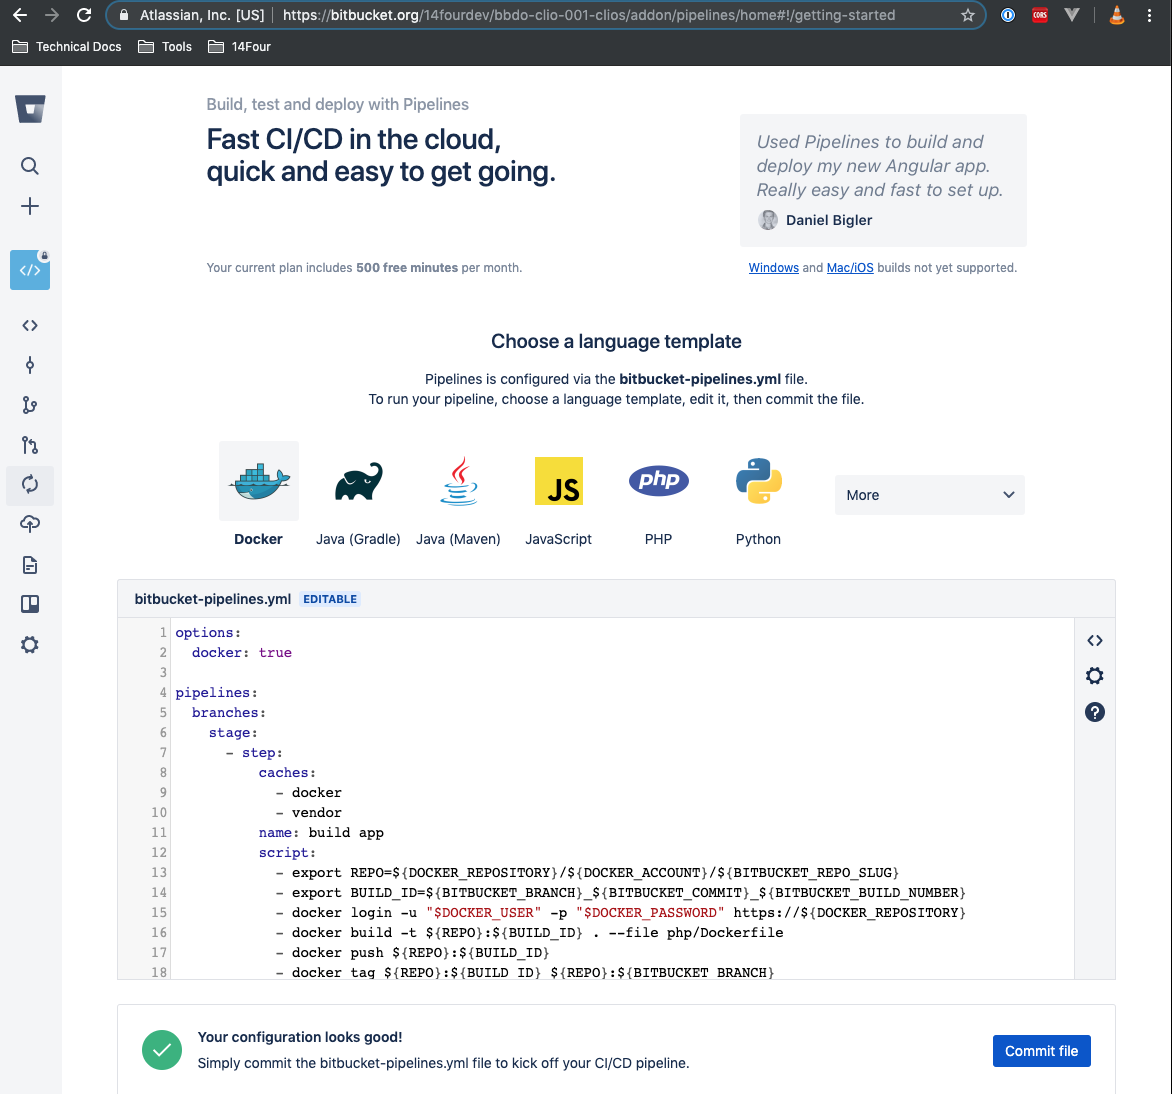
# 2) You can use this bitbucket-pipelines.yaml file as a template.
options:
docker: true

pipelines:
  branches:
    stage:
      - step:
          caches:
            - docker
            - vendor
          name: build app
          script:
            - export REPO=${DOCKER_REPOSITORY}/${DOCKER_ACCOUNT}/${BITBUCKET_REPO_SLUG}
            - export BUILD_ID=${BITBUCKET_BRANCH}_${BITBUCKET_COMMIT}_${BITBUCKET_BUILD_NUMBER}
            - docker login -u "$DOCKER_USER" -p "$DOCKER_PASSWORD" https://${DOCKER_REPOSITORY}
            - docker build -t ${REPO}:${BUILD_ID} . --file php/Dockerfile
            - docker push ${REPO}:${BUILD_ID}
            - docker tag ${REPO}:${BUILD_ID} ${REPO}:${BITBUCKET_BRANCH}
            - docker push ${REPO}:${BITBUCKET_BRANCH}
      - step:
          name: deploy
          image: alpine
          script:
            - apk add --update curl
            - curl -XPOST $APP_WEBHOOK

definitions:
  caches:
    vendor: vendor
  services:
    docker:
      memory: 2048
TIP
The ENV variables in bitbucket-piplines.yaml are pulled from the bibucket server. You do not need to set them yourself.
# 3) Go back to the portainer stack you created and enable webhooks for your app.
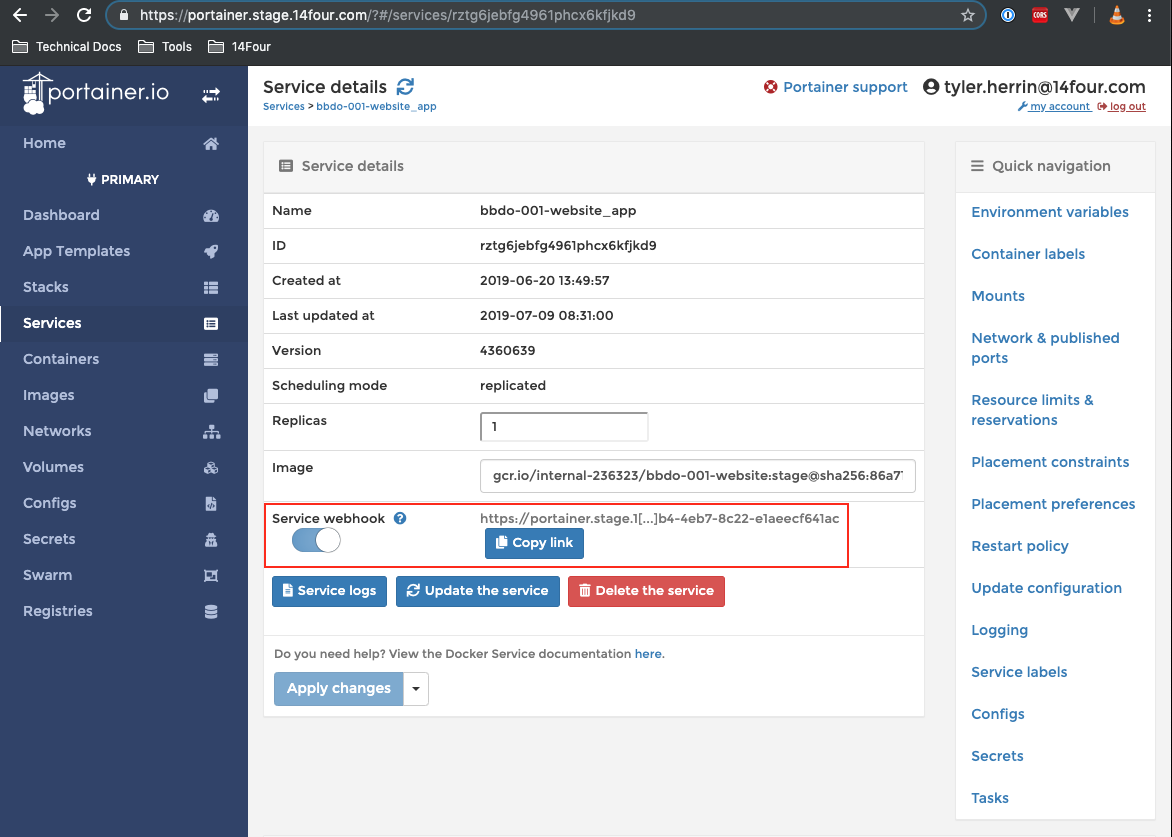
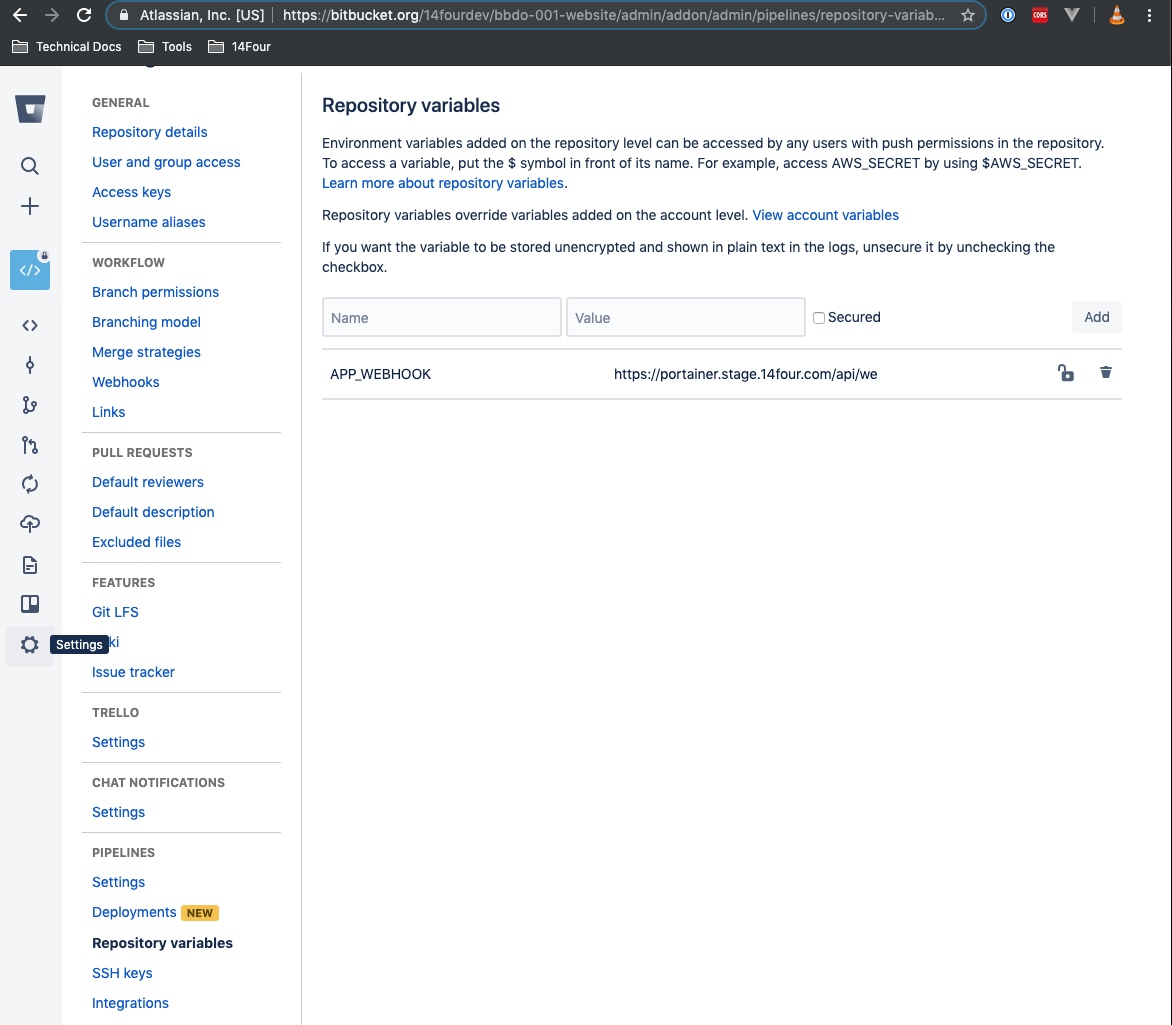
# 4) In your bitbucket repo navigate to Settings->Repository Variables
Add the webhook you just enabled in portainer as a reposistory varible in your bitbucket repo.
WARNING
If your web app has queue and migration containers they will also need their webhooks enabled and setup in bitbucket-pipelines.yaml and in your bitbucket repository variables to have an automated deploy.
# Congrats, your web app should now deploy when you push to your stage branch on bitbucket!
← Frontend Staging SSL →