# Elastic Beanstalk (ELB)
# EB CLI
# EB Initalize Profile
TIP
View the IAM Page if you need to create a AWS key and secret access key.
Set your profile's AWS key and secret access key in ~/.aws/credentials
[demo-application]
aws_access_key_id = AKIAASOMEACCESSKEYID
aws_secret_access_key = hhlHSsomeawssecretaccesskey
Run eb init --profile you-profile
➜ DemoApplication eb init --profile demo-application

Select a default region
1) us-east-1 : US East (N. Virginia)
2) us-west-1 : US West (N. California)
3) us-west-2 : US West (Oregon)
4) eu-west-1 : EU (Ireland)
5) eu-central-1 : EU (Frankfurt)
6) ap-south-1 : Asia Pacific (Mumbai)
7) ap-southeast-1 : Asia Pacific (Singapore)
8) ap-southeast-2 : Asia Pacific (Sydney)
9) ap-northeast-1 : Asia Pacific (Tokyo)
10) ap-northeast-2 : Asia Pacific (Seoul)
11) sa-east-1 : South America (Sao Paulo)
12) cn-north-1 : China (Beijing)
13) cn-northwest-1 : China (Ningxia)
14) us-east-2 : US East (Ohio)
15) ca-central-1 : Canada (Central)
16) eu-west-2 : EU (London)
17) eu-west-3 : EU (Paris)
18) eu-north-1 : EU (Stockholm)
(default is 3): 3

Select an application to use
1) Demo Application
2) tma-quaker-secret-life-of-pets-2
3) 14Four
4) [ Create new Application ]
(default is 4): 1
Do you wish to continue with CodeCommit? (y/N) (default is n): n
Your EB CLI profile should now be setup!
# EB SSH Setup
If your EB CLI profile is configured you can setup SSH and create your key pair from the EB CLI.
WARNING
Save your generated keypair files (~/.ssh/) as well as the associated passphrase in 1Password. Otherwise you will need to generate a new keypair if they are lost.
➜ DemoApplication git:(master) eb ssh DemoApplication --setup
WARNING: You are about to setup SSH for environment "DemoApplication". If you continue, your existing instances will have to be **terminated** and new instances will be created. The environment will be temporarily unavailable.
To confirm, type the environment name: DemoApplication

Select a keypair.
1) aws-eb-14four
2) [ Create new KeyPair ]
(default is 2): 2

Type a keypair name.
(Default is aws-eb): aws-demo-application
Generating public/private rsa key pair.
Enter passphrase (empty for no passphrase):
Enter same passphrase again:
Your identification has been saved in /Users/tyler.herrin/.ssh/aws-demo-application.
Your public key has been saved in /Users/tyler.herrin/.ssh/aws-demo-application.pub.
The key fingerprint is:
SHA256:EySL19fTo59VCZwJYL0pTUwpXt407MHxRT04D9OSvPE aws-demo-application
The key\'s randomart image is:
+---[RSA 2048]----+
|      . .o=oBoB.+|
|     . =.. B ^oo+|
|    . o + B O #oo|
|     .   = = * E.|
|        S . .   .|
|         .   . o |
|              o  |
|                 |
|                 |
+----[SHA256]-----+
Enter passphrase:
WARNING: Uploaded SSH public key for "aws-demo-application" into EC2 for region us-west-2.
Printing Status:
2019-07-16 18:43:37    INFO    Environment update is starting.
2019-07-16 18:43:43    INFO    Updating environment DemoApplication's configuration settings.
2019-07-16 18:43:59    INFO    Created Auto Scaling launch configuration named: awseb-e-p3apccymjp-stack-AWSEBAutoScalingLaunchConfiguration-DSBWFPKRRC5Q
2019-07-16 18:44:33    INFO    Deleted Auto Scaling launch configuration named: awseb-e-p3apccymjp-stack-AWSEBAutoScalingLaunchConfiguration-1G3YSH7OO99O7
2019-07-16 18:44:34    INFO    Successfully deployed new configuration to environment.
You should now be able to SSH into your server.
➜ eb ssh
INFO: Attempting to open port 22.
INFO: SSH port 22 open.
INFO: Running ssh -i /Users/tyler.herrin/.ssh/aws-demo-application
Enter passphrase for key '/Users/tyler.herrin/.ssh/aws-demo-application':
 _____ _           _   _      ____                       _        _ _
| ____| | __ _ ___| |_(_) ___| __ )  ___  __ _ _ __  ___| |_ __ _| | | __
|  _| | |/ _` / __| __| |/ __|  _ \ / _ \/ _` | '_ \/ __| __/ _` | | |/ /
| |___| | (_| \__ \ |_| | (__| |_) |  __/ (_| | | | \__ \ || (_| | |   <
|_____|_|\__,_|___/\__|_|\___|____/ \___|\__,_|_| |_|___/\__\__,_|_|_|\_\
                                       Amazon Linux AMI

This EC2 instance is managed by AWS Elastic Beanstalk. Changes made via SSH
WILL BE LOST if the instance is replaced by auto-scaling. For more information
on customizing your Elastic Beanstalk environment, see our documentation here:
http://docs.aws.amazon.com/elasticbeanstalk/latest/dg/customize-containers-ec2.html
# Creating a Web Server Application
TIP
Most of our AWS accounts have only one application per account. Production and staging servers are separate environments within the application.
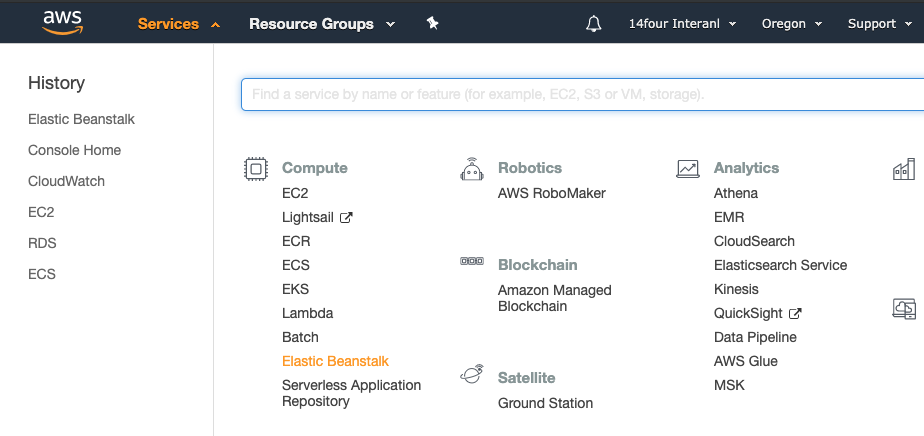
# Log into your AWS account and navigate to elastic beanstalk.
# Create new application
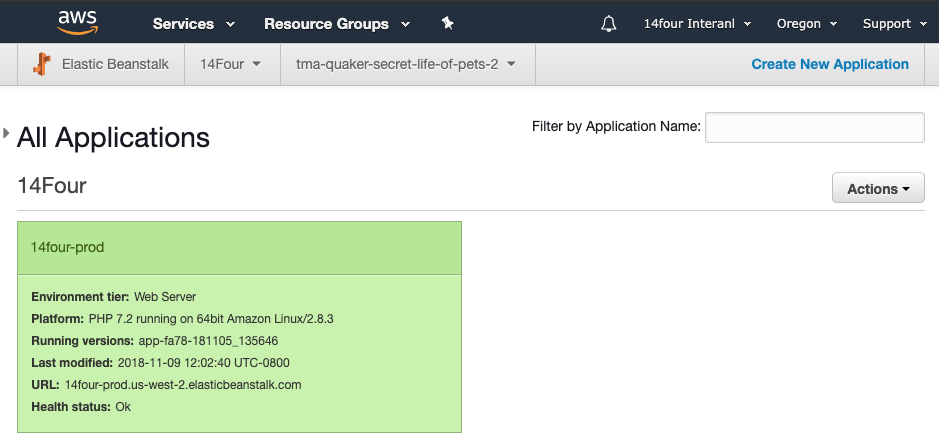
Click on Create New Application in the top right corner.
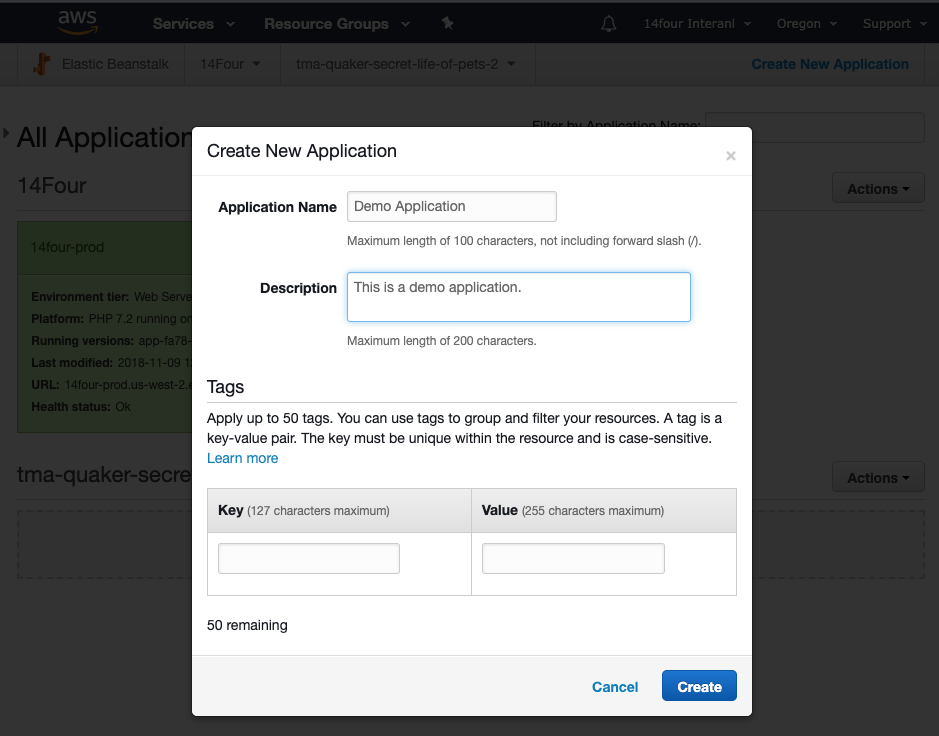
Fill out the application name and description and click create!
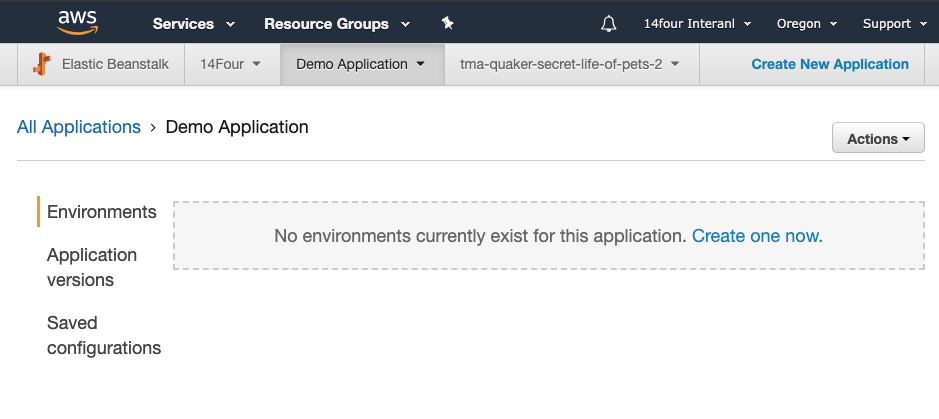
# Create an environment
Click on the Actions dropdown and select Create environment.
Select Web server environment 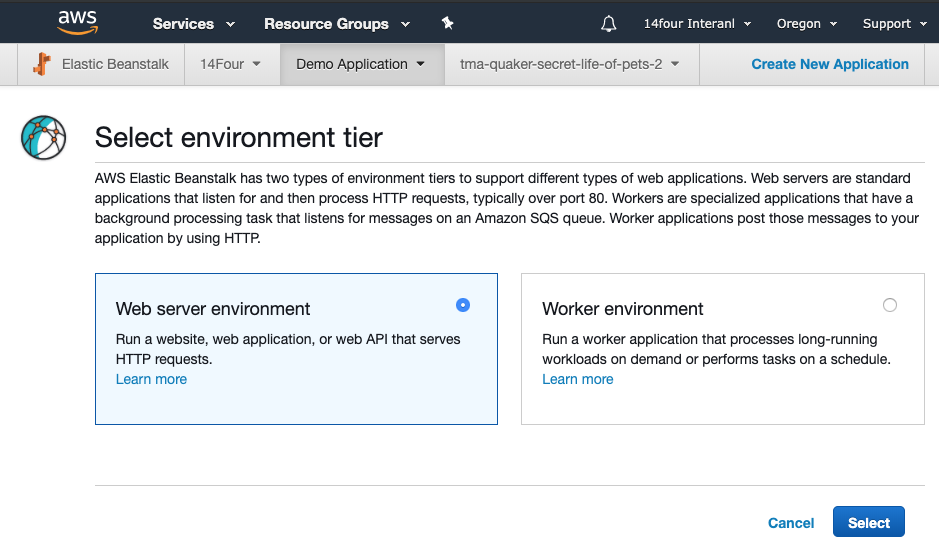
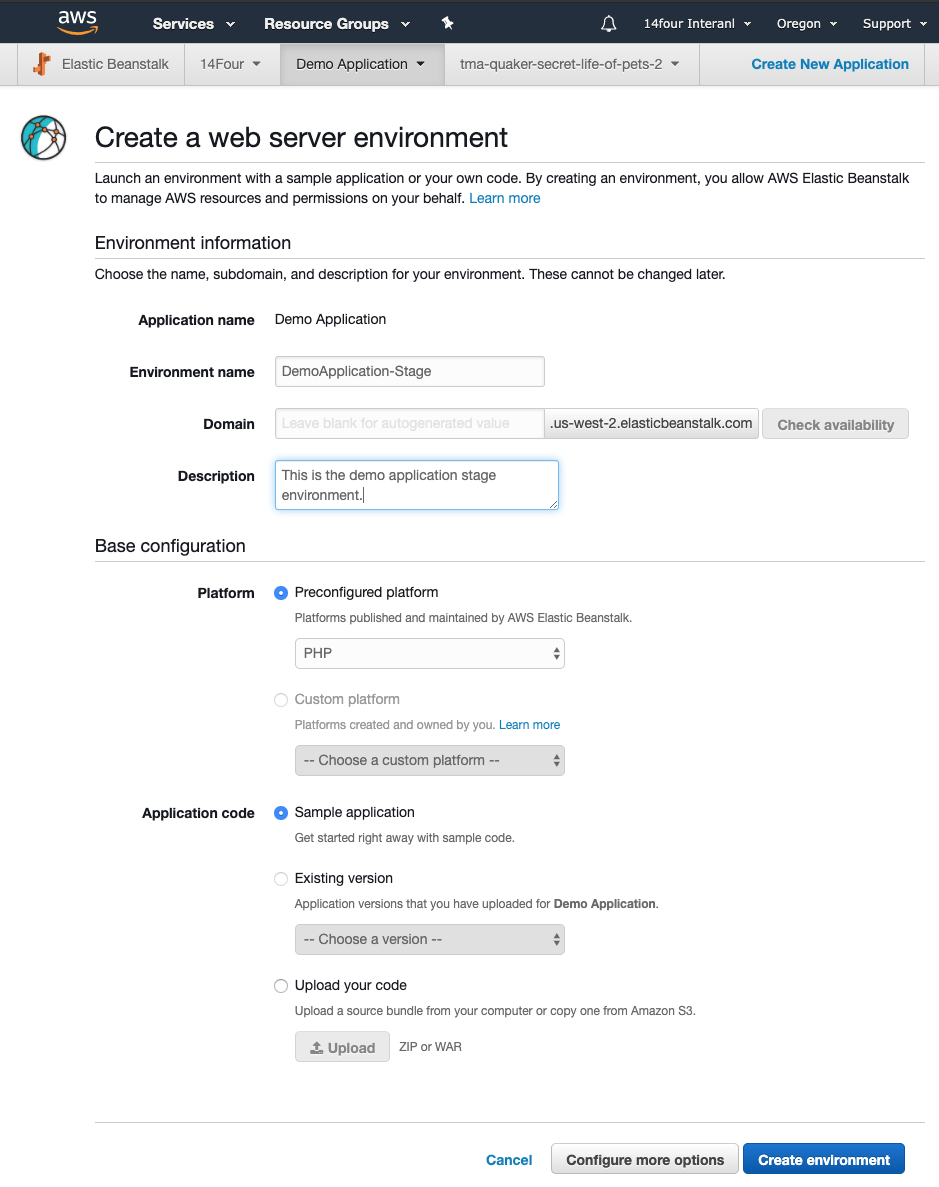
Name the environment and select your preconfigured platform (PHP most likely). Leave sample application selected for now and create the environment.
# Configuring the Environment
# Configuration Overview
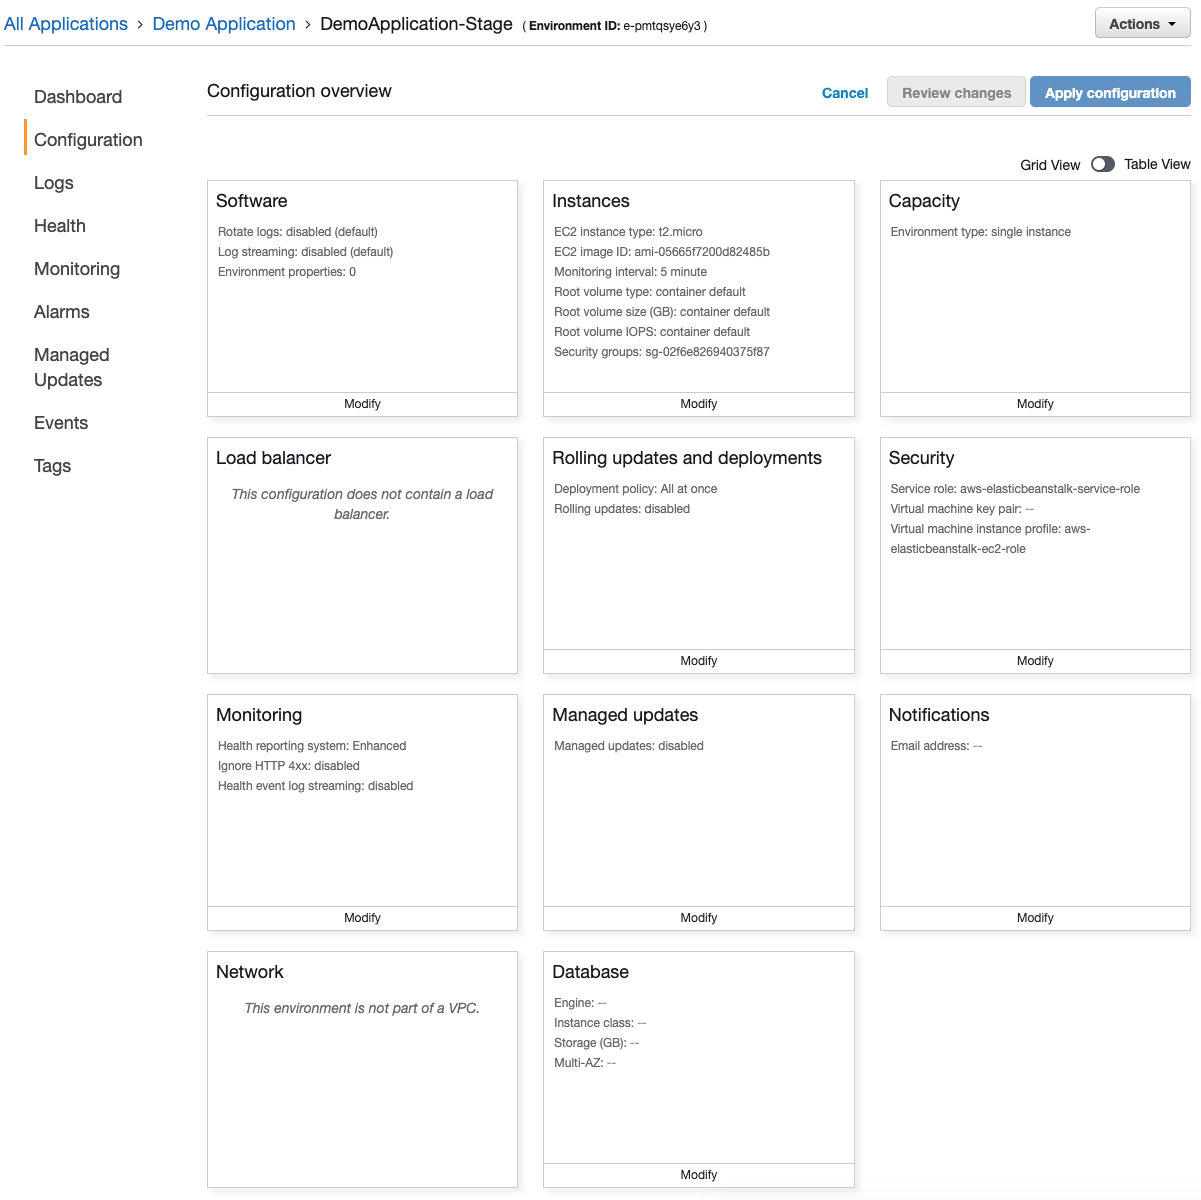
Navigating to the configuration tab. Here you will be shown various submenus you can enter to configure the environment in different ways.
# Software
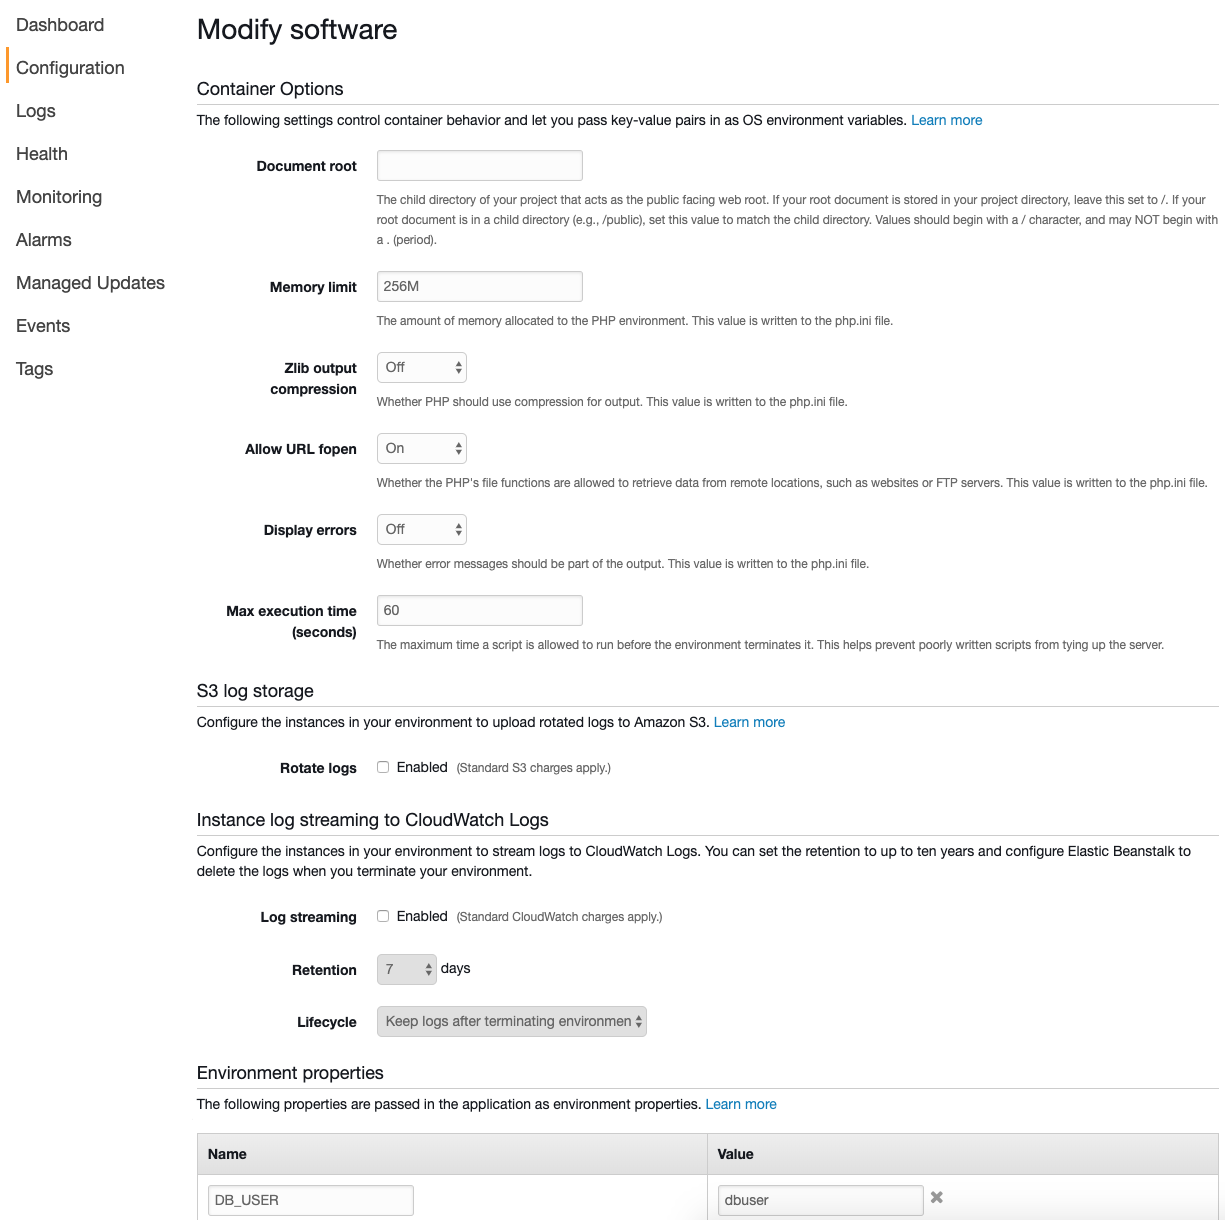
Document Root: This is the root of your web app.
TIP
Most likely php/web or php/public.
Environment Properties: These are the local environment variables.
TIP
Most of these can be copied from your local dev .ENV, but some variables may be specific to staging or production.
# Instances
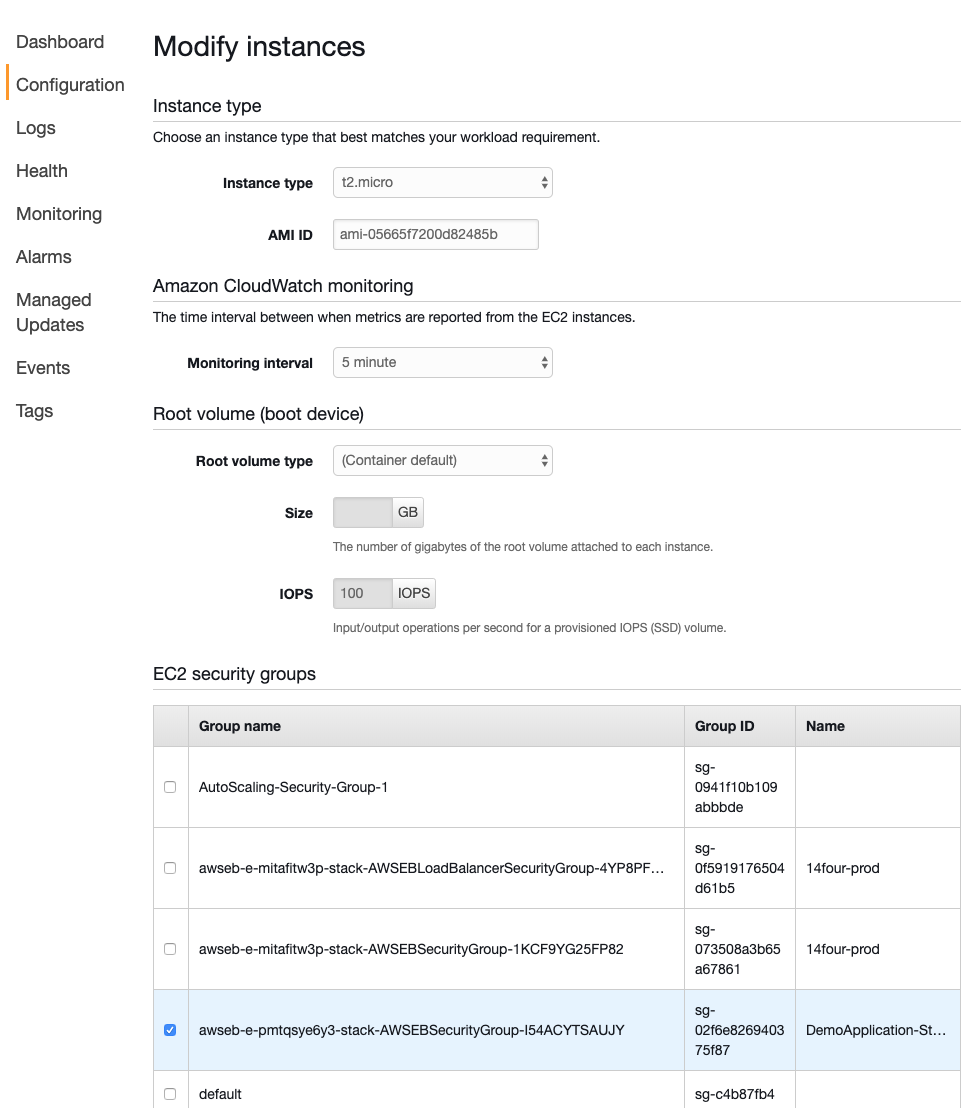 Instance Type: This is the type of EC2 Instances your environment will run. You can find details on the different tiers here (opens new window).
EC2 Security Groups: This is a list of the EC2 security groups that exist on your AWS account. You can attach security groups to the EC2 instance to give it the permissions of the security group.
# Capacity
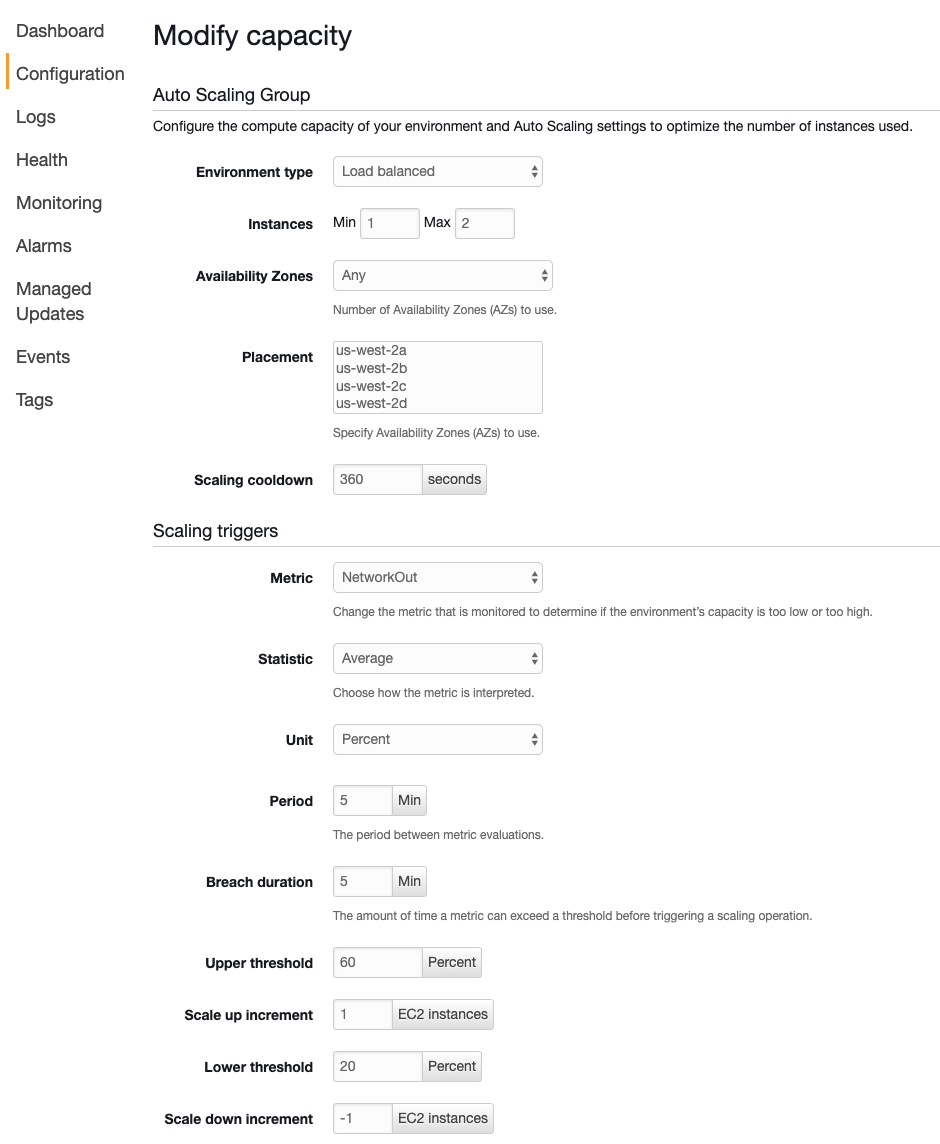 Environment Type: Single Instance or Load Balanced Instace. Load balanced instances will have scaling triggers so that it will automatically scale up/down instances when reaching certain thresholds.
TIP
We usually do a load balanced instance. The number of instances needed will be dependant on the project's needs.
Instances: The minimum and maximum amount of instances for the scaling policy.
TIP
For staging servers a 1:2 policy is sufficient.
Unit: The unit that we are measuring for our scaling policy.
TIP
This is usually set this to percent.
Upper threshold: The amount per unit that must be reached for adding a new instance for auto-scaling.
TIP
This is usually set to 60 percent.
Lower threshold: The amount per unit that must be reached for removing an instance for auto-scaling.
TIP
This is usually set to 20 percent.
# Load Balancer
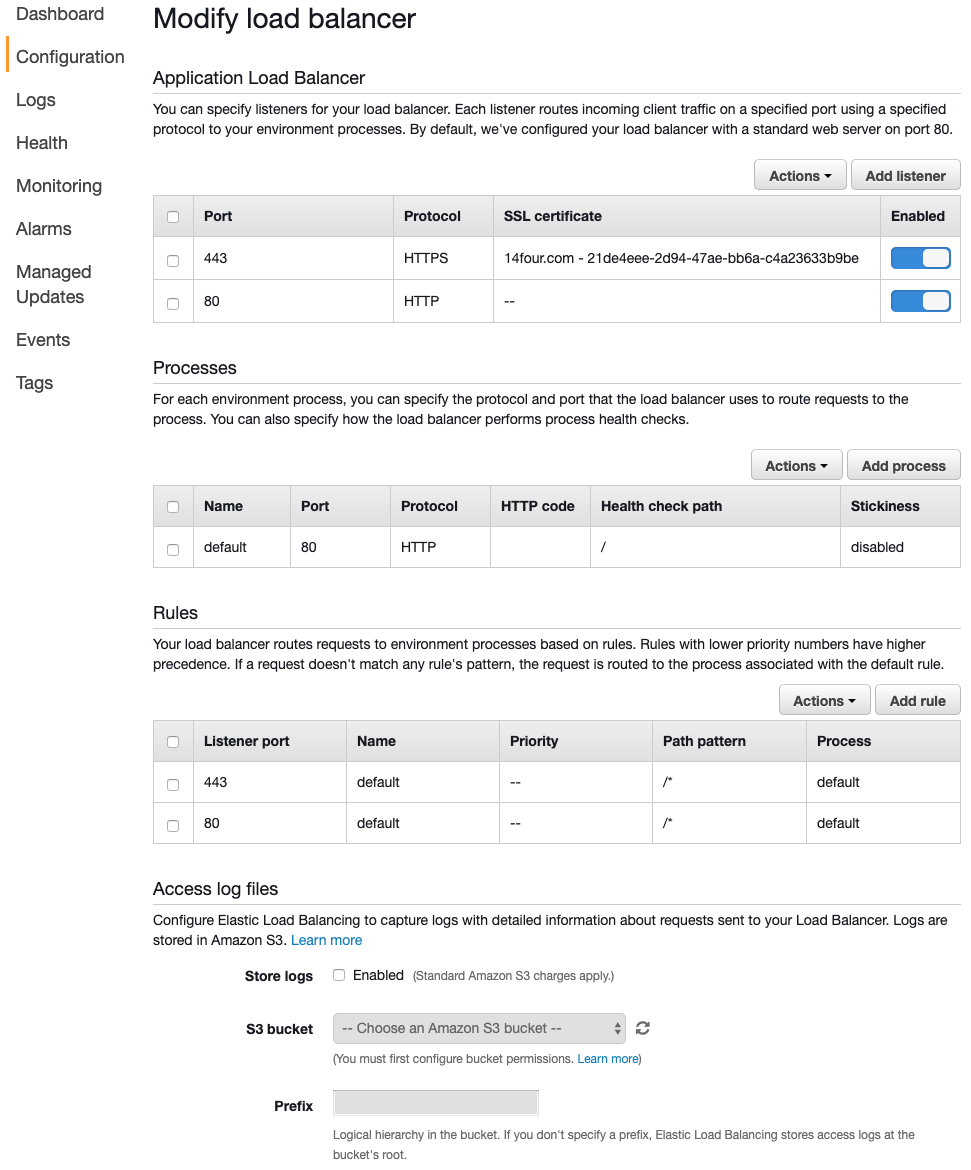 If you need to setup SSL you will need to add port 443 to the load balancer configuration. Otherwise the default settings should be adequate.
# Rolling Updates and Deployments
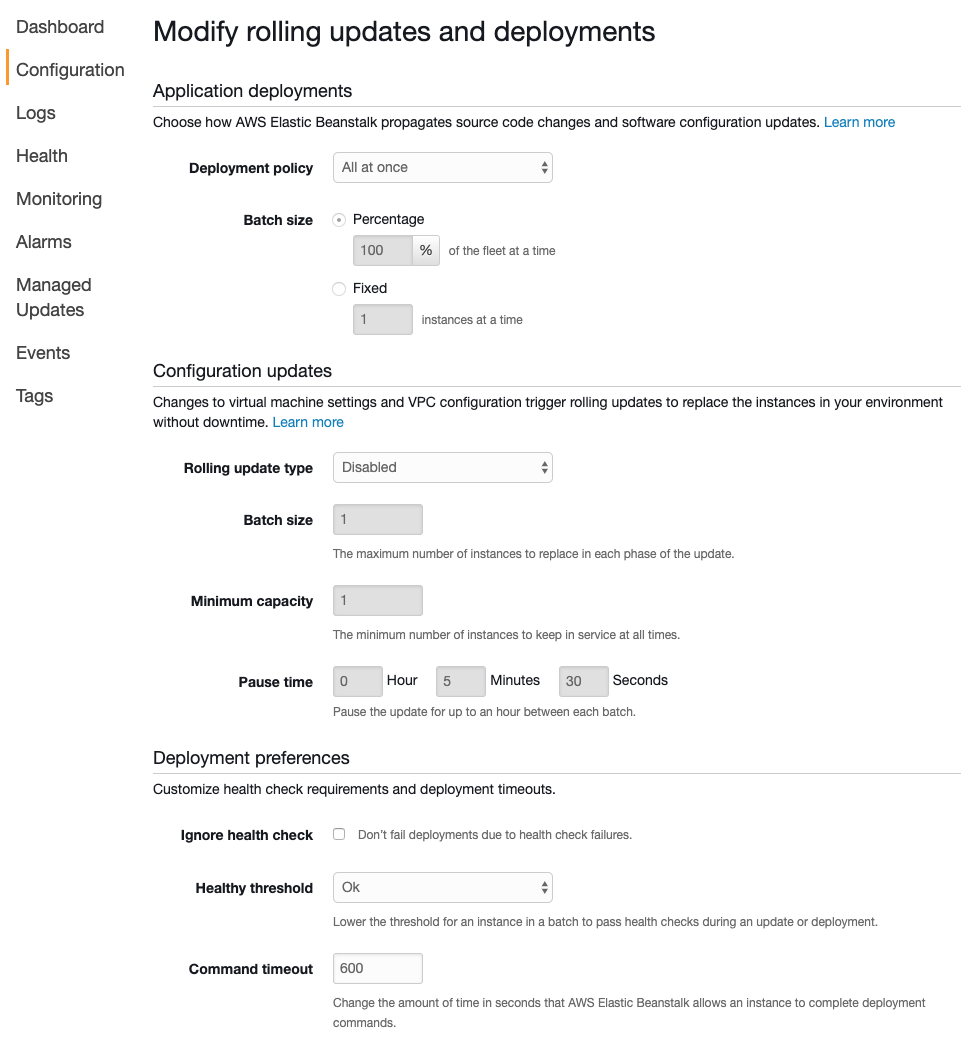 Default settings should be adequate.
# Security
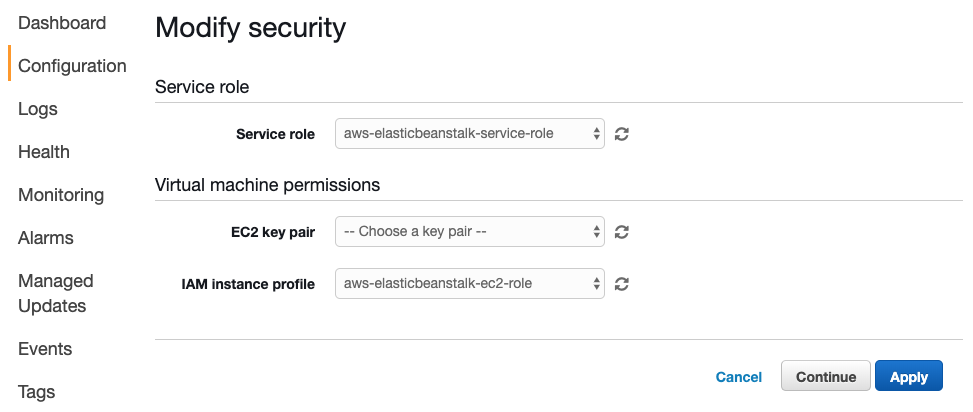 If you have already setup your elastic beanstalk profile you can perform
 eb ssh --setup from your project directory to generate a SSH key for your environment.
# Monitoring
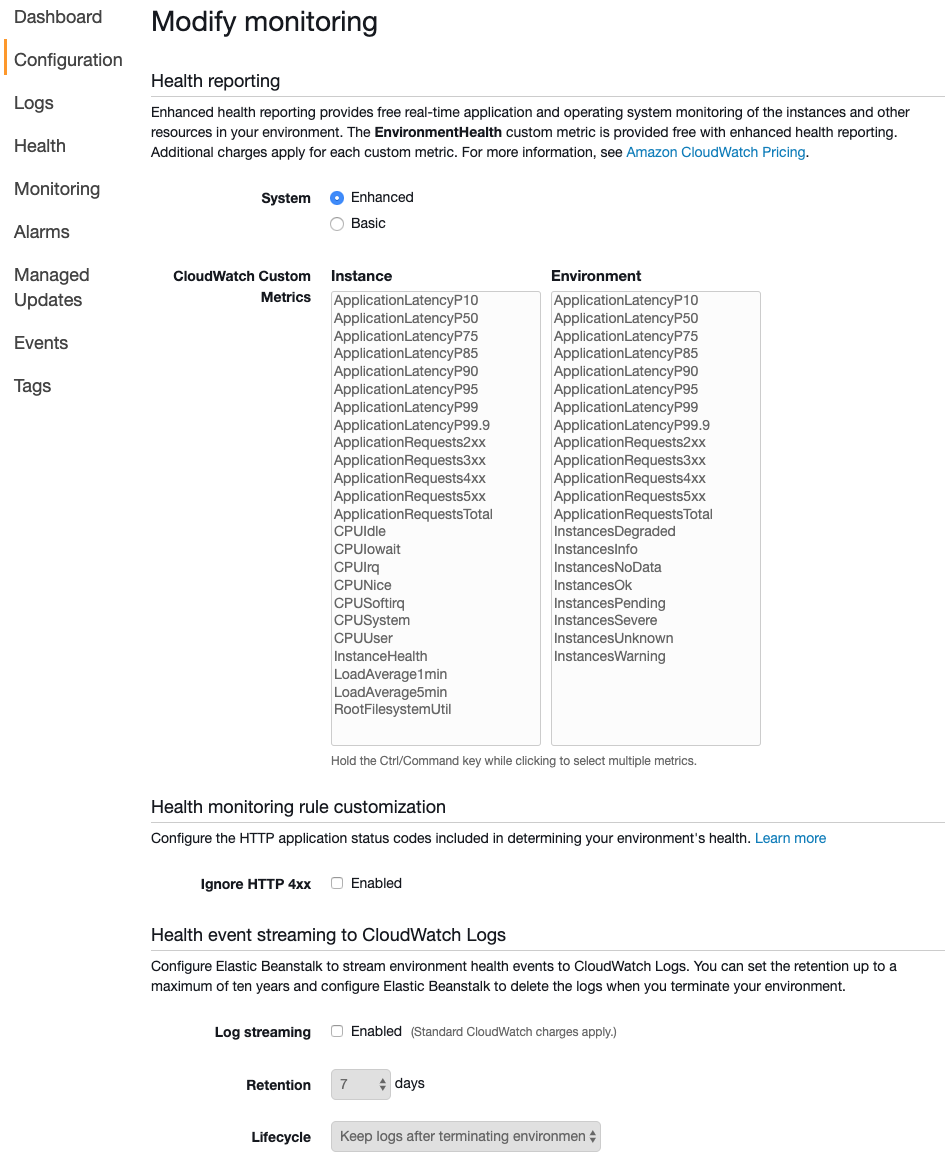 Default settings should be adequate, but if you are making a service worker instead of a web application you probably want to turn on just basic monitoring.
# Managed updates
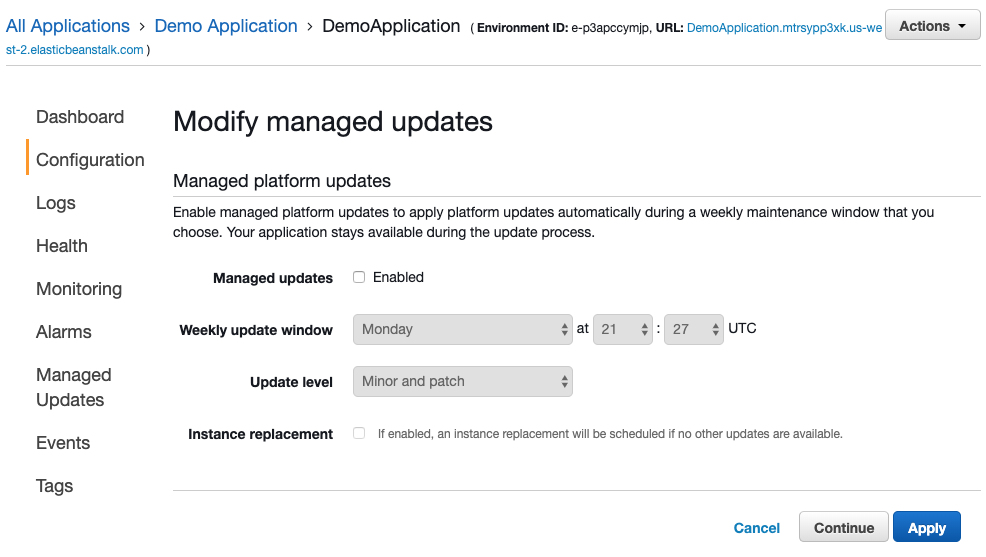 These are disabled by default. Turn these on if you want your platform to be updated automatically.
# Notifications
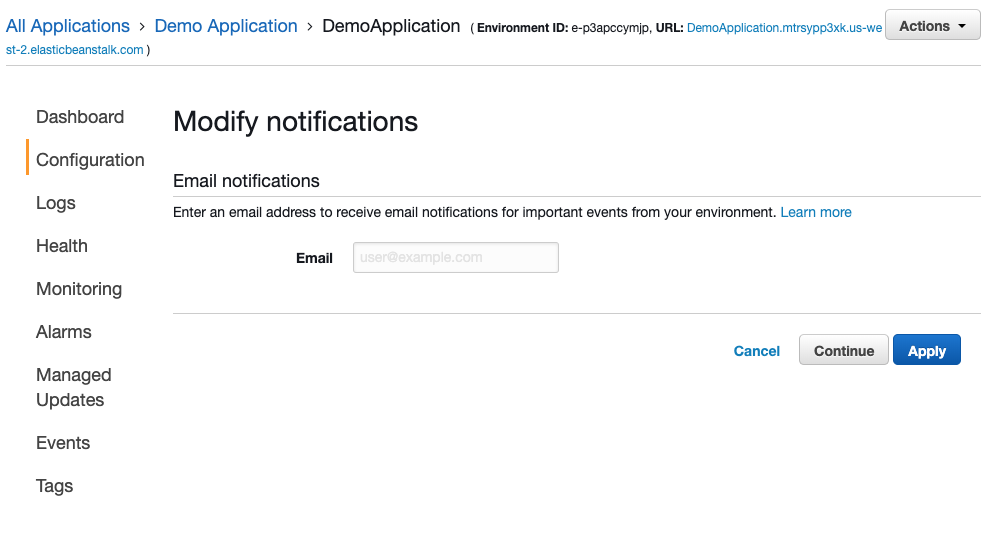 You can enter an email address to send environment notifications to here.
# Network
This only applies if you are using a Virtual Private Cloud (VPC)
# Database
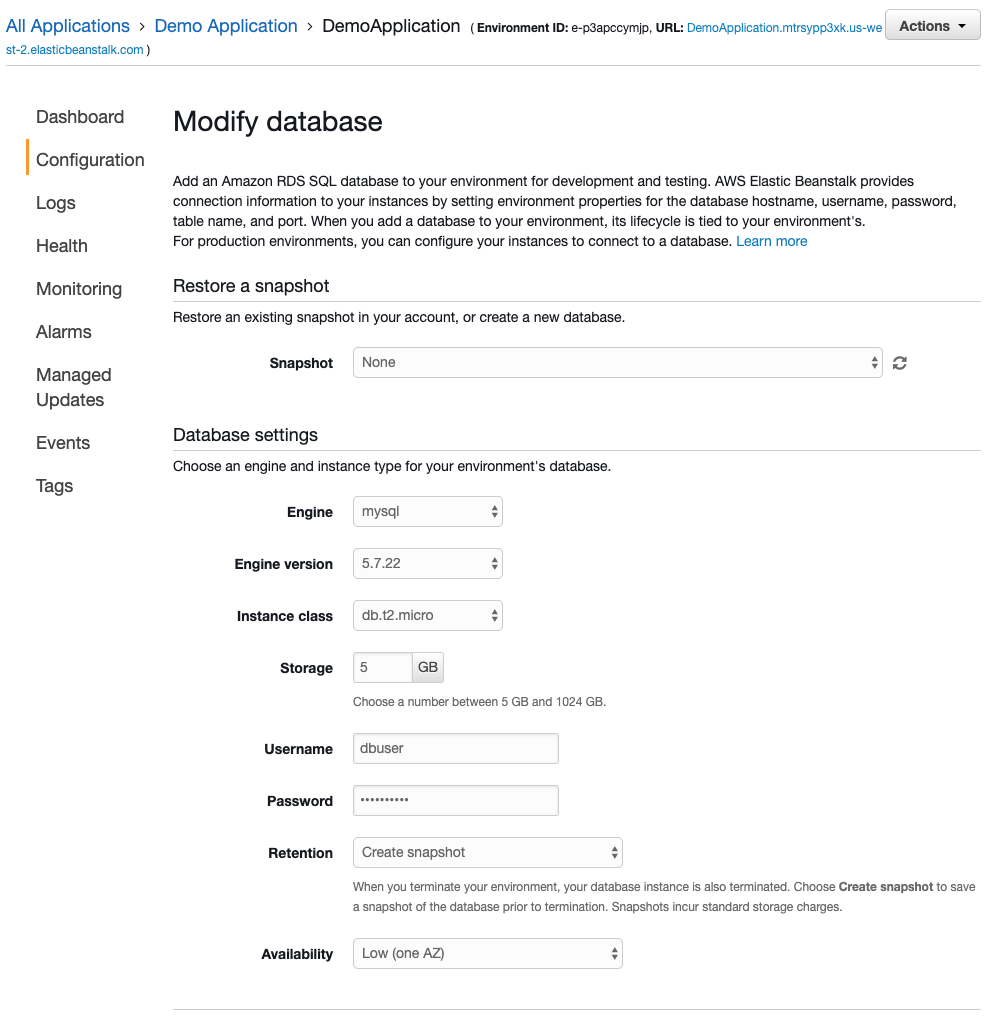 Setup your RDS mysql database.
TIP
Databases configured via ELB will automatically add the RDS credentials to the environment and do not need added to environment properties in software configuration.
# Creating a Service Worker
TO-DO
.